Crawling Before You Walk
If you are new to web development, setting up a static site that leverages GitHub Actions and Docker to deploy to AWS is a great way to start using modern web development tools without biting off more than you can chew at once.
Rather than do a deep dive into every tool and topic covered in this tutorial, I’ve provided carefully selected links for further reading. This way, you can explore the areas that interest you most at your own pace and delve into the specifics that matter most to your learning journey.
Why Use A Static Site?
Let’s first understand what a static site is.
A static site is a website where the content is pre-built and delivered to users exactly as stored, unlike dynamic sites that generate content on-demand.
A blog, by nature, will often be static because it serves all users the same content and only changes when new posts are added.
A static site is a great choice for this exercise because the setup and hosting costs should be much lower than a dynamic site.
Additionally, we are focusing on several different topics here (CI/CD, Containers, Cloud Computing), and want to keep the actual development and deployment efforts as simple as possible.
This tutorial will not be appropriate for dynamic sites because it uses only S3 and AWS CloudFront to deliver the site!
First Things, First - Define Outcomes
Before we start on anything, we should look at what our intended outcomes are and what tools and processes we’ll use to accomplish them.
Intended Outcomes:
- Create a blog and add your first post.
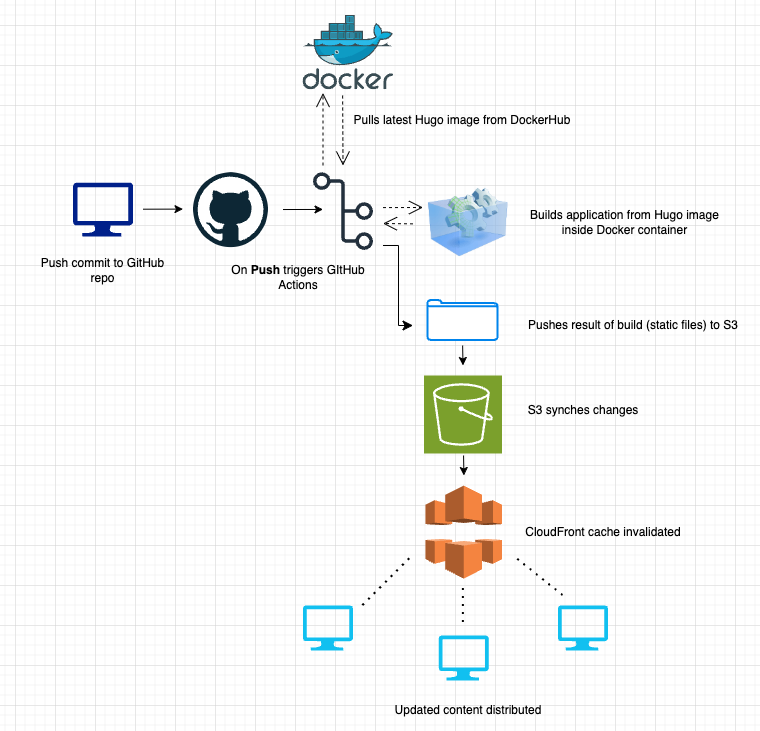
- Push the blog post commit to a GitHub repo that automatically triggers a CI/CD pipeline using GitHub Actions.
- This pipeline will pull the latest Docker image for the blog.
- Next, the pipeline will build the blog site inside a container created from the latest Docker image.
- Lastly, the pipeline will push the build artifacts to S3 where CloudFront will fetch and distribute them.
Here’s a diagram illustrating the process in more detail:

AWS S3 and CloudFront - Background
If you do not have an AWS account already, follow the instructions here to setup an account: https://docs.aws.amazon.com/accounts/latest/reference/manage-acct-creating.html
As previously mentioned, we’re going to use AWS S3 to host the static build files from our pipeline and next use CloudFront to distribute those resources.
If you’re new to AWS, S3 is an object storage service that acts as the origin server/storage for your website files, including HTML/CSS/JavaScript files, images, etc.
CloudFront is a CDN(Content Delivery Network) that can be configured to sit in front of S3 and maintains cached copies of your files at edge locations worldwide. This allows faster delivery of content, particularly static files such as images, videos, and even HTML.
With S3, all files are stored within a single region, which is great if the entirety of your userbase is coming from that same region. However, users outside of that region that access content from your site may see significant latency because of distance.
For this reason, we want to use CloudFront in conjuction with S3 to quickly deliver content to users across different geographic locations.
An important point to note here is that we’re still talking about static sites and non-dynamic content. If we have a dynamic site and storing customer data, this setup is not appropriate
AWS S3 - Setup
Create your S3 bucket with the following:
- Go to AWS Console –> S3
- Create new bucket and enable Static website hosting under the bucket properties
- Configure the bucket for public access:
{
    "Version": "2012-10-17",
    "Statement": [
        {
            "Sid": "PublicReadGetObject",
            "Effect": "Allow",
            "Principal": "*",
            "Action": "s3:GetObject",
            "Resource": "arn:aws:s3:::YOUR-BUCKET-NAME/*"
        }
    ]
}
AWS CloudFront - Setup
Next, we want to provide CloudFront with the ability to connect to our S3 bucket and distribute the resources to Edge Locations.
- Open the CloudFront console
- Choose Create Distribution
- Set Origin domain as your S3 bucket’s website endpoint
- Enable redirect HTTP to HTTPS
- Set default root object to index.html
- Record the Distribution ID. We will use this later with our GitHub Actions pipeline.
At this point, we’ve prepared the S3 Object and CloudFront network to distribute our content, but we still have a ways to go before actually pushing our content to AWS.
AWS S3 - Policy Modification
Now that we have created our CloudFront distribution, we’ll want to change our S3 policy so that it can only be accessed by CloudFront. Make the following updates in S3:
{
    "Version": "2012-10-17",
    "Statement": {
        "Sid": "AllowCloudFrontServicePrincipal",
        "Effect": "Allow",
        "Principal": {
            "Service": "cloudfront.amazonaws.com"
        },
        "Action": "s3:GetObject",
        "Resource": "arn:aws:s3:::YOUR-BUCKET-NAME/*",
        "Condition": {
            "StringEquals": {
                "AWS:SourceArn": "arn:aws:cloudfront::ACCOUNT-ID:distribution/DISTRIBUTION-ID"
            }
        }
    }
}
This ensures users can’t bypass CloudFront by going straight to S3 and provides secure communication between CloudFront and S3.
AWS IAM - Setup
We need to configure a new IAM user to use with our GitHub Actions pipeline once it’s created.
- Go to IAM –> Users –> Create user
- Create an access key and secret key
- Attach a policy with these permissions:
{
    "Version": "2012-10-17",
    "Statement": [
        {
            "Effect": "Allow",
            "Action": [
                "s3:PutObject",
                "s3:GetObject",
                "s3:DeleteObject",
                "s3:ListBucket",
                "cloudfront:CreateInvalidation"
            ],
            "Resource": [
                "arn:aws:s3:::YOUR-BUCKET-NAME/*",
                "arn:aws:s3:::YOUR-BUCKET-NAME",
                "arn:aws:cloudfront::ACCOUNT-ID:distribution/DISTRIBUTION-ID"
            ]
        }
    ]
}
AWS Route53 - Setup
Up to this point, we’ve configured our storage and distribution network and setup user permissions but we don’t actually have a website.
To create a website, we’re going to need a domain name. We can use Route53 to purchase a domain.
- Go to Route53 –> Registered domains
- Register a new domain name
- Wait for registration to complete
After registering a domain name, we’re going to need to configure our Record Sets to point to our CloudFront distribution.
- Open your domain and select Create Record Sets
- Create new record with Record type: A
- Add the name of your domain
- Toggle the Alias to “Yes”
- Choose target as your CloudFront distribution
AWS S3, CloudFront, Route53 - Checking In
At this point, we have a domain for our site, we’ve setup the connection between S3 and CloudFront, but we don’t actually have anything to serve.
Before we proceed with building our site and pipeline, ensure you’ve successfully completed all the steps listed above.
If you are stuck or get off-track at any point, this is a great tutorial that can help you get back on track: https://docs.aws.amazon.com/Route53/latest/DeveloperGuide/getting-started-cloudfront-overview.html
Hugo - Installation and Setup
Next, we’ll create our site with Hugo.
Hugo is a great, open-source static site generator written in Golang. Hugo offers incredible speed and flexibility, and is particularly useful for creating a blog because it supports markdown and comes with dozens of built-in themes.
Learn more about Hugo here: https://gohugo.io/
To install Hugo, follow instructions here: https://gohugo.io/installation/
You can verify successful installation by running
hugo version
After you’ve verified successful installation, you’ll want to create a blog post or two so that you have content to deploy to your pipeline.
First create a new project and initiate git.
hugo new site my-site
cd my-site
git init
Next, add the theme you’d like to use via a submodule
git submodule add https://github.com/THEME-URL.git themes/THEME-NAME
To learn more about the different Hugo themes and their features, visit: https://themes.gohugo.io/
After you’ve added the submodule, you’ll may need to configure the config.toml file for your site. Additional information on this step can be found here: https://gohugo.io/getting-started/configuration/
Now, try adding your first blog post:
hugo new posts/my-first-post.md
Once you’ve added your first blog post, you’ll want to ensure you can build and run the project locally.
hugo server
If your build has compiled and you can view the site locally, congratulations!!
If you get stuck while building your Hugo site, take a look at the quickstart guide for additional guidance: https://gohugo.io/getting-started/quick-start/
GitHub Remote Repo - Setup
Now that you have the site running locally, you’ll want to setup and configure the remote GitHub repo.
- Create a new repository
- Next, open Settings –> Secrets and Variables –> Actions
- Add the following secrets:
- AWS_ACCESS_KEY_ID
- AWS_SECRET_ACCESS_KEY
- BUCKET_NAME
- DISTRIBUTION_ID
GitHub Local Repo - Setup
Next, we’re going to want to configure our local project to use the remote repo and setup our GitHub Actions pipeline.
Set the remote origin for your repo:
git remote add origin https://github.com/OWNER/REPOSITORY.git
Now we’ll create the workflow at the root of your project. We’ll use this to create our GitHub Actions pipeline.
mkdir .github/workflows
cd .github/workflows
touch deploy.yml
Building GitHub Actions Pipeline
In the previous step, we setup our GitHub Actions workflow in deploy.yml, but it’s currently blank.
Inside of the deploy.yml file, we’ll need to create our pipeline that will include - S3 object storage, CloudFront distribution, and our Hugo site.
While we’re setting up this pipeline, we’re also going to pull a Docker image to build our app inside a container and push the remote build artifact to our S3 Object (which CloudFront will use to distribute via Edge Locations).
If you’re new to GitHub Actions, you can learn more about the basics here: https://docs.github.com/en/actions/about-github-actions/understanding-github-actions
Start with this workflow inside your deploy.yml file:
name: Deploy to S3 and CloudFront

on:
  push:
    branches:
      - main
This provides the name of the workflow and instructs GitHub to run the pipeline on pushes to the main branch so we end up with something like this:

Next, specify the OS that we’d like GitHub Actions to run the job(s) on and what version of GitHub Actions to use:
jobs:
  build-and-deploy:
    runs-on: ubuntu-latest

    steps:
    - uses: actions/checkout@v2
      with:
        submodules: true
        fetch-depth: 0
Note - we specify submodules because in our Hugo site, we’ve included submodules.
Now, configure your AWS credentials to ensure that we can access S3 from the pipeline
    - name: Configure AWS credentials
      uses: aws-actions/configure-aws-credentials@v1
      with:
        aws-access-key-id: ${{ secrets.AWS_ACCESS_KEY_ID }}
        aws-secret-access-key: ${{ secrets.AWS_SECRET_ACCESS_KEY }}
        aws-region: us-east-1
If you recall, we added our AWS_ACCESS_KEY_ID and AWS_SECRET_ACCESS_KEY to our GitHub repo earlier.
Never, never, never include your secrets in plain-text in deployment scripts or anywhere else in your project
Next, we want to pull a Docker image from Dockerhub and build our site inside of a Docker container created from this image so that we generate build artifacts to push to S3.
    - name: Build Hugo site
      run: |
        docker pull hugomods/hugo:latest
        docker run --rm -v ${{ github.workspace }}:/src -w /src hugomods/hugo:latest hugo --minify --logLevel info
Docker images are the blueprints for creating Docker containers, and containers are the running instances of those images.
Learn more about Docker here: https://docs.docker.com/get-started/docker-overview/
Now that our app has been built inside a container, we are ready to deploy it to S3:
    - name: Deploy to S3
      run: |
        aws s3 ls s3://${{ secrets.BUCKET_NAME }} --recursive
        aws s3 sync public/ s3://${{ secrets.BUCKET_NAME }} --delete
        aws s3 ls s3://${{ secrets.BUCKET_NAME }} --recursive
The –recursive flag is used to perform the operation on all files and directories recursively. This means that the command will traverse through all subdirectories and apply the operation to each file and directory it encounters.
The –delete flag is used with the aws s3 sync command to delete files in the destination (S3 bucket) that are not present in the source (local public directory).
Lastly, we’ll need to invalidate our CloudFront distribution. If you recall, our CloudFront is pulling from S3 and if we do not invalidate the cache, we’ll be stuck distributing the older version from our CDN.
    - name: Invalidate CloudFront distribution
      run: |
        aws cloudfront create-invalidation --distribution-id ${{ secrets.DISTRIBUTION_ID }} --paths "/*"
Wrapping Up Our GitHub Actions Pipeline
At this point, you’ve connected all the pieces inside the pipeline. What you’ll want to do next is make sure that you’ve added and committed your changes locally, and git push to your remote repo.
In case you missed any steps, here is the full deploy.yml file:
name: Deploy to S3 and CloudFront

on:
  push:
    branches:
      - main

jobs:
  build-and-deploy:
    runs-on: ubuntu-latest

    steps:
    - uses: actions/checkout@v2
      with:
        submodules: true
        fetch-depth: 0

    - name: Configure AWS credentials
      uses: aws-actions/configure-aws-credentials@v1
      with:
        aws-access-key-id: ${{ secrets.AWS_ACCESS_KEY_ID }}
        aws-secret-access-key: ${{ secrets.AWS_SECRET_ACCESS_KEY }}
        aws-region: us-east-1

    - name: Build Hugo site
      run: |
        docker pull hugomods/hugo:latest
        docker run --rm -v ${{ github.workspace }}:/src -w /src hugomods/hugo:latest hugo --minify --logLevel info

    - name: Deploy to S3
      run: |
        aws s3 ls s3://${{ secrets.BUCKET_NAME }} --recursive
        aws s3 sync public/ s3://${{ secrets.BUCKET_NAME }} --delete
        aws s3 ls s3://${{ secrets.BUCKET_NAME }} --recursive

    - name: Invalidate CloudFront distribution
      run: |
        aws cloudfront create-invalidation --distribution-id ${{ secrets.DISTRIBUTION_ID }} --paths "/*"
Logging In GitHub Actions Pipeline - Optional
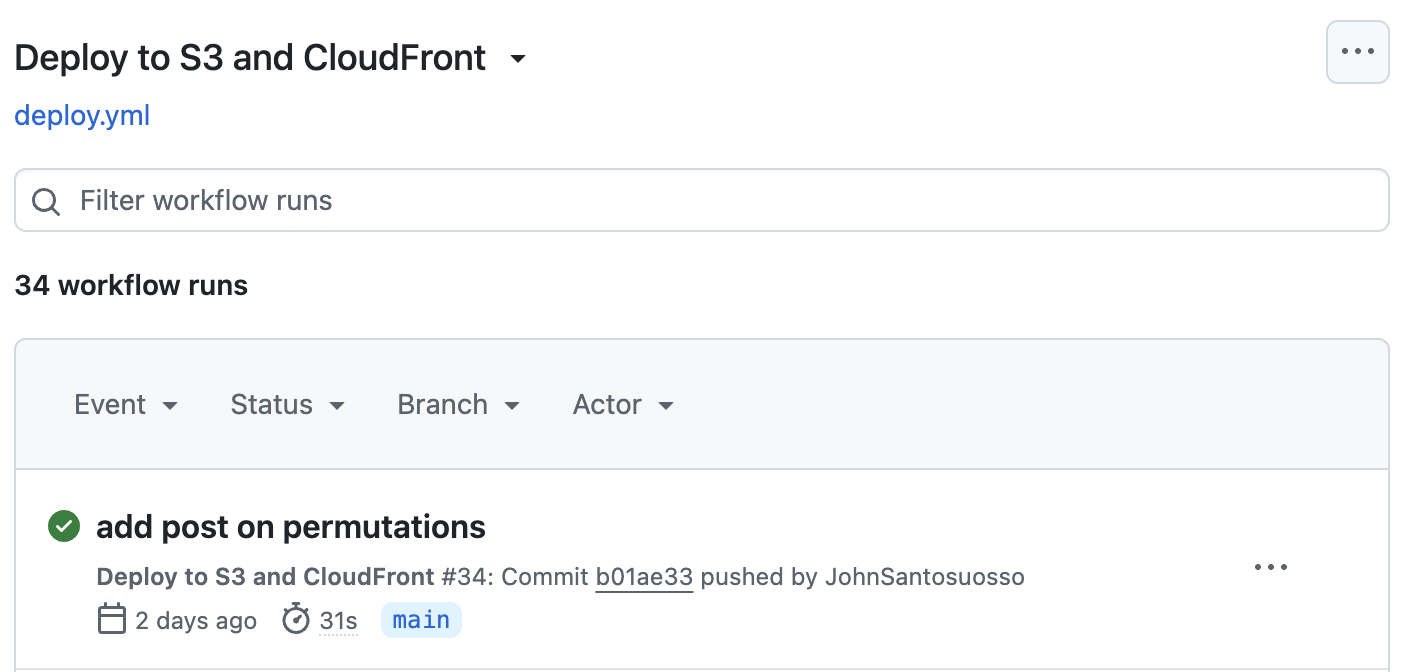
How do we know if the build succeeded and our static assets were successfully deployed to S3 and distributed via CloudFront?
We could try to visit the site and see if it updates, but a better course of action would be to monitor our pipeline on GitHub.
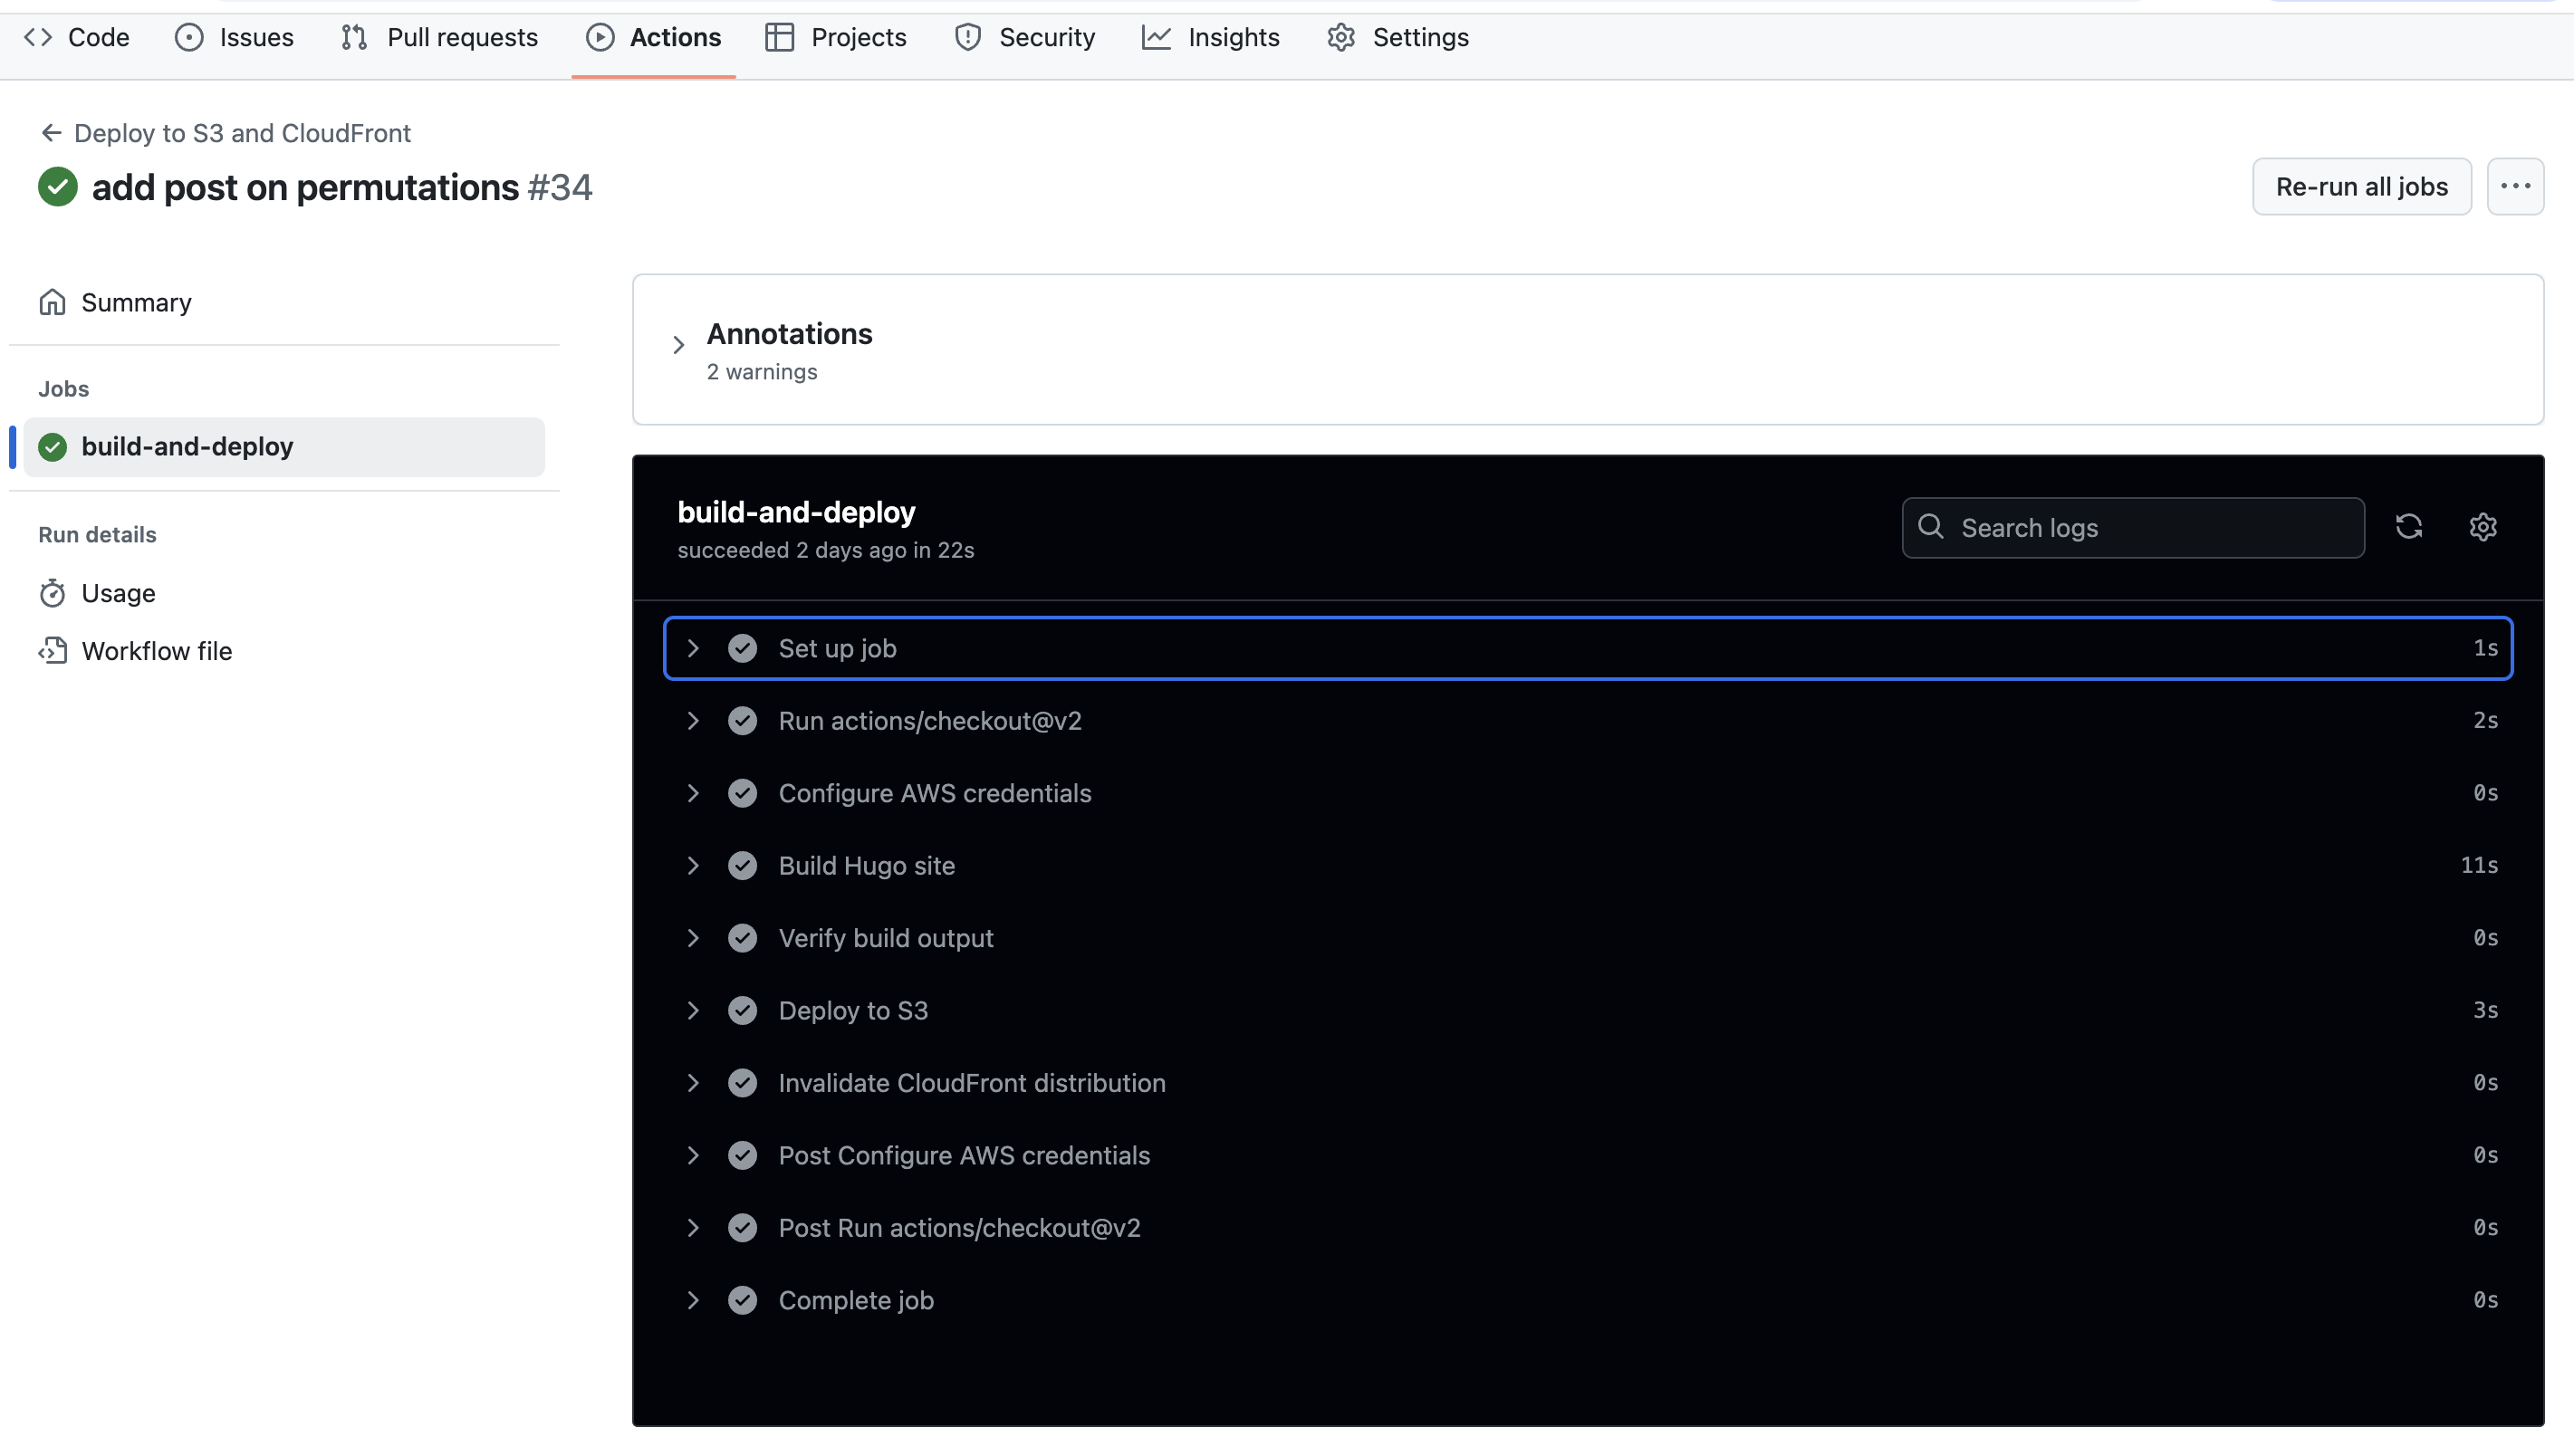
The Actions tab displays the build results in real-time and lets you determine if anything went wrong.

Note - on a production-level application, there are a multitude of tools that provide more detailed monitoring, but since this is a simple static site, we simply add logging statements at each step of the build to see if everything is working as expected.
Add the following logging statements to your workflow to see what is happening at each step and view more specific detail on whether anything failed:
name: Deploy to S3 and CloudFront

on:
  push:
    branches:
      - main

jobs:
  build-and-deploy:
    runs-on: ubuntu-latest

    steps:
    - uses: actions/checkout@v2
      with:
        submodules: true
        fetch-depth: 0

    - name: Configure AWS credentials
      uses: aws-actions/configure-aws-credentials@v1
      with:
        aws-access-key-id: ${{ secrets.AWS_ACCESS_KEY_ID }}
        aws-secret-access-key: ${{ secrets.AWS_SECRET_ACCESS_KEY }}
        aws-region: us-east-1

    - name: Build Hugo site
      run: |
        docker pull hugomods/hugo:latest
        echo "Current directory structure before build:"
        ls -la
        echo "Theme directory contents:"
        ls -la themes/ || echo "No themes directory found"
        echo "Building Hugo site..."
        docker run --rm -v ${{ github.workspace }}:/src -w /src hugomods/hugo:latest hugo --minify --logLevel info

    - name: Verify build output
      run: |
        echo "Public directory structure:"
        ls -la public/
        echo "Posts directory:"
        ls -la public/posts/
        echo "First post:"
        ls -la public/posts/first-post/
        echo "Second post:"
        ls -la public/posts/my-second-post/
        echo "Index.html content:"
        cat public/index.html | head -n 20
        echo "First post content:"
        cat public/posts/first-post/index.html | head -n 20

    - name: Deploy to S3
      run: |
        echo "Current S3 bucket contents:"
        aws s3 ls s3://${{ secrets.BUCKET_NAME }} --recursive
        echo "Syncing to S3..."
        aws s3 sync public/ s3://${{ secrets.BUCKET_NAME }} --delete
        echo "Final S3 bucket contents:"
        aws s3 ls s3://${{ secrets.BUCKET_NAME }} --recursive

    - name: Invalidate CloudFront distribution
      run: |
        aws cloudfront create-invalidation --distribution-id ${{ secrets.DISTRIBUTION_ID }} --paths "/*"
End Result
If you’re viewing the build on Actions, you should see the workflow run through each step and inform you whether the build succeeded or failed:

You should also verify functionality by visiting your site and ensuring changes were properly updated.
Troubleshooting
If you run into issues, first check the workflow with logging statements and try to determine what step may have failed.
If your workflow has succeeded and the build artifact was successfully pushed to S3, then it is likely your issue lays in the S3, CloudFront, or Route53 setup.
If you’re not able to determine the root cause, feel free to contact me anytime: https://200-success.dev/contact
Conclusion
In this tutorial, we utilized many tools, including: automated CI/CD pipelines, images/containers, and cloud computing.
I hope you’ve found this beneficial and if you’ve found any of the topics particularly interesting, I’d encourage you to explore them in more detail.